


Ingredients needed:
Watered-down Dawn dish washing liquid. There's no special ratio. Add just enough water to make the liquid thin and runny yet still able to suds up.
Access to hot and cold tap water. Wool felts more quickly when it is subjected to sudden temperature changes.
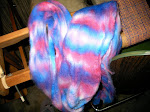
 Wool. The amount you need will be based on the size of the vessel you desire. I photographed an assortment (far more than I need for this project). The bagged fibers are odds and ends of left over wool. You can also purchase roving like that braided in the picture. (Shown right: When the braid is undone it is actually one continuous fiber preparation.)

A smooth, water-proof object to form your fibers around. I will be using a small golf ball. In my top picture, left of the golf ball is a lotion jar that would also serve nicely as a form for a small vessel. You can also use a great variety of other objects: empty coffee cans with secured lids (tape the lids down well), basket balls, beach balls etc. Anything that is smooth and will keep its shape when wet.

In this tutorial I am making a very small vessel using a golf ball as the form. It is a good idea to start with a small project as you get a sense of the process. The first step is to lightly wet down the shape you've chosen. Then gently add a thin layer of fiber. Remember whatever colors you choose for the first layer will be the colors of the INSIDE of your vessel. This may be important when felting a large, open vessel.
Continue to add thin layers of fiber all around the shape you've chosen. Take care to have an even amount of wool over the entire shape. Take care as well not to move the fibers around. At this point the goal is to gently adhere 3 even layers of fiber completely over the shape using the diluted dish liquid. It is a good idea to criss cross the layers alternately. Example: The first layer may be adhered vertically and the second layer or wrap of wool is horizontally applied.

Because I am using a golf ball it is easy to gently begin to introduce friction as a felting method. Very gently roll the wool-covered golf ball around in your hands as you would roll a ball of cookie dough only apply little to no pressure. Take care not to displace the wool. The sudsy liquid will aid in this process.
You will notice that the fibers begin to settle into one another and adhere more firmly to the ball. They will actually begin to tighten around the shape. At this point you can apply friction with more pressure. When you are confident that the fibers won't be disturbed you can apply friction while alternately running the project under hot then cold tap water. The hot water opens up the fibers relaxing them. Alternating to cold water shocks the fibers causing them to intertwine and felt together. Continue to apply friction while rolling the ball under the hot then cold water.
When felting larger objects you will need to apply gentle friction to small areas at a time but the process is the same.

Once the fibers feel to be reasonably felted you are safe to cut a small hole in the wool. This will be the vessel openning or top so place the cut accordingly. This openning will stretch greatly when you work to remove the shape inside. It is a good idea to make as small an openning as possible. You can always enlarge it if necessary.

Above you can see just how large that little openning became. It was a good bit of work getting the golf ball out of the vessel but, I'm quite glad I cut only a tiny hole. Please note that at this point the vessel is larger than the shape used to form it. We are not done felting. This vessel will become smaller than the golf ball. When choosing shapes for other wet felting projects remember to work with something that is larger than what you want the finished piece to be.
Now that the shape has been removed you will further felt the fibers. You can be rather rough with the wool at this point. Continue to liberally apply the diluted dish liquid as you apply friction to the vessel rolling and rubbing it in your hands. When working with a very large project I like to use a washboard and vigorously scrub the wool to expedite the felting process. Remember, with a larger object you will be working the fiber into the shape you desire. If you felt one area more than another the project will become tighter and thicker in the worked section. You can use this to your advantage in making interesting forms. If you are wishing to have an evenly felted vessel take care to apply the same friction to all areas of the project evenly.
Continue as well to utilize temperature change to shock the wool. Alternating hot and cold water while incorporating diluted dish liquid will expedite the felting process.

Above: After further felting the vessel is now smaller than the form over which it was shaped. Again, always form your vessel around a shape that is larger than you desire your finished project to be.

Above: I'm giving this fuzzy vessel a little trim. Wet felting can be done with most any animal fibers. The wool blend I chose had a little mohair in it and created a bit of a fuzzy halo. While I like a furry effect in some wet felted projects this vessel had a nice color play that I wanted to show off. Using sharp scissors to nip off the fuzz is one way of finishing a piece. If a furry effect is desired one can brush up the fibers and intensify the halo. It is a matter of preference, whatever you desire.

Embellishments ~ There are as many ways to decorate a finished vessel as there are creative ideas to be had. If you enjoy embroidery, knitting, crochet, needle felting, jewelry making, wire work, etc. you can incorporate your favorite craft interests into the vessel.
For this little project I spun a fine thread that picked up the colors of the felted fibers. Using a small, sharp crochet hook (I chose size 6) I puctured holes along the top opening of the piece and crocheted into them and around. Don't be hindered by a desire for a specific pattern to follow. Just have fun doodling with your chosen craft activity. You can even wet felt multiple pieces and sew them together! It's all fun.
Below is the finished vessel. I really like the color play in this one:

Below are a few more little wet felted creations made using a golf ball as the forming shape and embellished with a simple crochet hook and thread. They'd make great little containers for small jewelry gifts, tooth fairy pouches, even as adornments to a necklace.

I hope this tutorial was helpful in providing an overview of the basics of wet felting. If you are new to the process I heartily recommend you start small and simply to let yourself get a feel for the various stages of felting and the overall process. (Warning: If you enjoy wet felting then you'll LOVE dry needle felting which is a process of sculpting dry fibers with a sharp, barbed needle. It is very different from wet felting and a great way to create unique doll and animal characters.)


8 comments:
Oh oh oh thank you! That is so cool! I have been wanting to learn this!! I am going to try this this week!! Beautiful!! Hugs, Sarah
Very nice tutorial, thanks.
Very cool, they are beautiful!
Perfect! Just what I was looking for to do a wet felt project with some summer camp waldorf children. I couldn't decide upon a stone or something else for a treasure pouch and your beautiful work has inspired me to hunt for some golf balls!
Your other work is incredible too, I would love to feature you on my blog, will be in touch!
Very neat thank you for the tutorial!
Your tutorial is really great, and I love the finished projects you have felted. I am in awe.
Thank you! I needed a refresher as I stopped felting for a few years but now have the time again. Really helped!
Omg this lovely tutorial is absolutely stunning. After the holidays I'll be making this and possibly making it for presents next xmas. Thank you so much for this article I know it had to take alot of time .
Post a Comment