


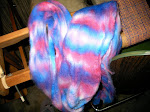
I'm going to braid 4 oz. of Merino top (Merino is a particularly wonderful breed of sheep). The round ball of fiber has been gently pulled away from the larger bump. A "bump" is just a term used to describe an extremely huge amount of top that has been wound into a gigantic coil of fiber at the end of a commercial combing process. As you can see my "bump" is dwindling down to a dangerously low level. (Because I am fiber-addicted this situation is cause for intense anxiety and must be rectified pronto! But, for now let us forge ahead.)

See what I've done above? The 4 oz. of fiber that has been laid out in a very long 'N' shape. The body of the 'N' gives you the three strands needed to create your braid without breaking the top into 3 pieces. (We want to keep the entire 4 oz. of wool as one continuous length of top.)

We'll start the braid of the top at the top of the 'N' (shown above).


...tuck in the end and start braiding.

Braid and braid and braid. You'll find you have to untangle the thing as you go. The end piece at the bottom can be easily pulled out of the entanglement. Once you've reached the bottom of the braid simply tuck the loose end into the last of your twists.


VOILA!

You have a nice, orderly, continuous 4 oz. length of combed top!
Now, let us have a word on this whole braiding matter: I am very much a function over form type of gal, "Heck, 'em braids surely do look mighty purty" and all that but, if it doesn't serve a purpose beyond astetic appeal I'm really not interested in braiding fibers.
So, why do it? Well, you can condense a large amount of pre-measured fiber this way. A nice, compact braid stores easily and well. Also, when providing supply for other textile enthusiasts pre weighed portions of braided top travel very well! The braiding serves to protect your combed preparation from being disturbed in transit. (What good is combed top if it is all jumbly?) A person can also easily offer and display a large variety of choice in a small space.
On a more evil note, my most favorite reason for braiding combed top is because a person can really have a crazy-good time dying the unsuspecting braid.

See all the lovely separate areas that a braid naturally creates for multi-colored dying? Wouldn't it be just the most meniacal fun to inject dye stock solutions willy-nilly into those little puffs? Oh how it thrills me to know that, at this very moment, I have 4 individual braids of a lustrous wool and mohair blend awaiting me in the dye laboratory. Heh, heh, heh. More will be revealed.


12 comments:
Cool!! :) I am going to have a knitting tutorial because I?? Just don't get it. (insert feeling sorry for Sara music now..)
I found your blog when I searched for a quick tutorial on braiding fiber. I just had to tell you that the pictures of the felted objects along the sides are truly incredible. You are a very very talented fiber artist!
A friend of mine linked me to your tutorial on roving braiding and it is so helpful! Thank you so much.
oh wow thanks i never realized it was so easy :)nice pictures and I love the spider you made wow what does one cost?
Hi! I just saw your tutorial! I'll try to do mine in the following days! Good luck!! hehehe
Btw, where do you buy the top merino wool? ...if you don't mind my asking :)
Thank
Hi!
I just found this tutorial and it's wonderful! I'll try to make mine :)
btw, if you don't mind my asking...where do you buy the fiber? I'm in Spain and all I find is overseas
Thanks!
Hi, i love the plait. If i wanted to make a 15ft plait how many oz's of merino top would i need. Thanks x
With regard to how many oz. of Merino you'd need to create a 15 ft finished length:
I believe the weight would not be so much a factor as the starting length. If you want a finished length of 15 ft. you will need to start with well over 45 ft. I'd start with a 50 ft. length and see what finished length you had after braiding/plaiting. If you always purchase your wool top from the same vendor then you can weigh the finished plait and know what is needed to make fairly consistent lengths at 15 ft.
Hope that helps a bit.
Thank you so much for this tutorial!
Hey! Found your tutorial because I'm feeling ill and sorry for myself and googling things I thought I couldn't do - turns out I can! Great description and lovely writing style, you brought a smile to my wee face. An all round thanks for this one :p
How could I make a braided blanket measuring 2ft by 2ft...or somewhere in those dimensions. Doesn't have to be exact. Thank you!
So *that's* how you do it! Well I never - it's easy when you know how isn't it? Plus, I loved your tutorial - short sentances, words of one syllable and lots of pictures. Just what a simple minded soul like me needs. Thanks!
Post a Comment