
Showing posts with label Free Knitting Pattern. Show all posts

Mar 19, 2010

Free Knitting Pattern Tissue Box Cover Cozy

As is customary of "The Treadler" I do have my yammerings to share  but FIRSTLY,  Let's have a go at this pattern shall we?

MATERIALS NEEDED: 

One upright, (squarish) naked tissue box in need of cozying.

U.S. size 5 / (or 40 cm)  16" Circular knitting needles OR a set of 5 double pointed knitting needles OR well, you know, there are a great many ways to knit in-the-round so choose your favorite and follow me.

Crochet hook size  1/2 .75mm to embellish the top (optional).

Yarn:  By the new weight standard you want to use #3, Light Weight (the old alias for this yarn size is DK Light-Worsted.) At this point I've made 3 cozies and none of them weigh more than 2.5 ounces. You can safely complete a cozy with less than 3 oz. of yarn.

4 place markers (I just use scrap yarn in a slip knot) One should be of a different color than the others to mark the beginning of each round.

NOTE: The above boils down to, "use the needle size and yarn that gives you approx. 21 stitches per 4 inches across. You will control the height as you knit. AND, remember you are dressing a tissue box. It is not going to refuse to wear your cozy or complain that the cozy is too baggy or too tight, makes it look fat, etc...

I spin my own yarn so...no particular brand endorsement from me except to say, "Come on and start spinning! You'll love it!" Also, you can use wool so that if the cozy is too big for its box there's the option to felt it down a bit.

CAST ON: You'll be knitting around to make a square. Cast on 88 stitches. There are 4 sides to the tissue box so that's 22 stitches per side. (We'll use the stitch markers to tell us where the corners are.) 

Round 1: Place a marker at the beginning (It should be a different color than the other 3) and  join your stitches. Be sure that your cast on stitches aren't twisted or you'll be in MOBIUS land. (K 22, place a marker) 3 times then K22 = 88 total stitches.

Round 2: (This round is what you will be doing most of the time)
(K 4, P 2, K 4, P 2, K 4, P 2, K 4) Repeat 3 more times, or at the start of each marker, all the way around.

Repeat all of round 2  four more rounds.

Cabling Round: (Time to make the pretty twisties.)  
*K 4, P 2 (Slip next 2 stitches onto cable needle and hold them behind your work, K 2 stitches, now K the 2 stitches from the cable needle, P 2) Repeat everything in parenthesis once more, K 4. One side is complete

Repeat from * all the way around (3 more times). If cabling is new to you check out this link:

Note: You don't need a special cable needle, you can use a dbl pointed needle OR, be a brave little soldier and try this flying trapeze method:
This is fast and easy but, can be a little scary for folks afraid they might drop a stitch.

CONTINUING ON: For the entire body of the pattern you will knit Round 2 Five times then complete a cabling round. Keep doing this until your knitting will cover the height of the box. Depending on your particular knitting style the number of rows will vary. Your tissue box is about 5.5 inches tall (14cm) so be sure your knitting is just a little bit longer than that. Now you are ready to decrease at your 4 corners to knit over the top of the box and to the center opening.

DECREASING ROUNDS (In essence you are starting at a corner):
(K 1, K2tog, K to the last 3 stitches before your next corner marker, Slip one stitch as if to knit, slip the next stitch as if to purl, slide the left needle back into them and knit them together from the back, K last stitch) Repeat 3 more times all the way around your box.

Questions about decreasing? Here's a good link for ya: http://www.knittinghelp.com/videos/decreases

These decreasing rounds are pulling in the 4 corners of your box. You are decreasing two stitches at each corner or 8 stitches per round.

First round of decreases will take you from 88 total stitches to 80
the second round will bring you down to 72 and so forth.
I like to complete 7 full rounds of decreases for all my tissue box magic. IF you are using a circular needle for your work you will want to switch to double pointed needles as the project shrinks down.

By the end of the 7th round of decreases you will have a total of 32 stitches left. Bind off these last 32 stitches but do not break the yarn. 

CROCHET Embellishment for top (This is optional but, really jazzes up the top of your box with a ruffley opening for the little tissues):

ROUND 1: Place crochet hook in that last bound off stitch and ch3, Double stitch all the way around in each of the bound off knit stitches and join.

ROUND 2: Chain 3 and *Dbl crochet in first stitch, 2 dbl crochet in next stitch, repeat from * all the way around. You have increased your stitches dramatically (every other stitch) creating a bit of a ruffle in this opening. Join.

ROUND 3: Ch1, sc in first stitch, (*ch3, sc) Repeat from * all the way around.

Bind off and work in all the loose ends. Mission accomplished!


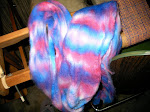
Above is a picture of my fluffy fibers before they were spun into yarn. You can see I blended the wool to slowly change color along the way. I think it is fun to make the tissue box become lighter and lighter as it gets to the top. That fluffy, white tissue peeking out really POPS. But, you can do anything you want...

Create yourself a box that is all one color, or heathery, or twinkled, or has a smaller opening, or has a different cable design in the middle of each side or...well, the possibilities are endless. I never dreamt I'd be all up-into making tissue box cozies but, here I am sending Claxton to the drug store on mega-tissue runs and planning cozies for everybody on my holiday gift list (act surprised). Sad? Yes! But, this entire web log is laden with similar obsessions so at least I have the comfort of consistency.


And there you have it! A lovely, free pattern just in time for allergy season!  Whoah! I may have just had an epiphany whilst typing this. What say you to a fair Isle tissue cozy? Would that not be the coolest thing ever? Bohus cozy? (Clearly, we will be needing more tissue boxes.) To the Spinning Wheel AWAY! 

Oct 5, 2009

Another Free Cotton Cloth Knitting Pattern: Evergreen of the North Woods

Here's a fun cotton cloth design that knits up quickly and has a bit of a Northwoods theme:


For ease in reading I have spread the row-by-row instructions over two pages. To Print: Click on each instruction page individually to enlarge. Then print the enlarged picture. If you have any difficulty simply email me and I'll happily send you a PDF version. My email address is at the top of the right column of this web log. I am working to post jpeg picture instructions that print clearly for everyone so don't feel badly about emailing me. I'd like to know if you're having a problem and I am unable to upload PDF patterns here.

For those following the silkworm adventures the little rascals are getting bigger and cuter! I look forward to a week from now when some of them should be close to spinning cocoons. When they spin silk they crawl into a cozy knook (paper towel roll or egg carton) and begin throwing lustrous silk about as they repeat a figure 8 pattern with their little heads. I look forward to seeing all of the snowy white cocoons.

I do not intend to reel the cocoons as is traditional practice. I want to see the entire cycle and will be watching the feathery moths burst forth. They are snowy white, beautiful and only live for about 5 days. The moths are born with no mouths and, although they have brilliantly white wings they cannot fly. Their sole activity is to mate and lay tiny, tiny eggs that I will store in petri dishes and then place in refrigeration to simulate a dormant winter season.  (I've promised the guild I'd share silkworm eggs with those interested in pursuing this sort of adventure.)

The silk noil that remains after the moths have emerged I will gently simmer, dye lovely colors, dry and then card those shiny fibers into woolen blends for hand spinning. The goal is to photograph this tedious adventure all along the way so, stop back by won't you?  (And, witness the madness.)

Sep 22, 2009

Free Knitting Cotton Cloth Pattern

Happy Autumn to you!

And, with Autumn comes crisp, colder weather which can only mean it's almost WOOL season! (Oh boy, oh boy, oh boy, oh boy...) Almost. Actually, I believe that every season is wool season but, it isn't cold yet so let's grab up that soft, absorbent cotton and get to work on another fun little wash or dish cloth pattern.
*

I love springy, sproingy wool and haven't knit much with cotton myself. I know from spinning bunches of cotton that it doesn't have that elastic wonderfulness a carefree and loose-knittin' individual can take for granted with wool. With cotton I'm quickly learning to knit tight little stitches. Tight, tight, tight! So, I use size one needles and try to pretend to be very tense but still I knit loosely. Perhaps if I were to watch a scarey movie, one where a timid person goes up into an old haunted attic to investigate a frightening noise while alone, in a night gown, armed with only a candle nub...
*
But, hey let's get you started! Here's the graph:

And, here are the play-by-play instructions.

It should print up very easily for you but, if you do have a hard time you'll find my email address at the top right column of this web log. Drop me a note and I'll send you PDF attachments.
A toast to a colorful Autumn ahead! Time to start picking apples and such. I'll be at the Wrenshall first-ever Fall Festival demonstrating hand spinning and drum carding this Saturday, Sept. 26th. So, if you are in that neck of the woods over the weekend stop by and say, "Hello!" Remember, if you haven't yet discovered hand spinning and making your own fabulous yarns I urge you to try it.  You are in for a treat.

Sep 19, 2009

Free Goldfish Wash or Dish Cloth KNITTING PATTERN


Around my neighborhood we have a little something called "East End Day". If you live in the East end of this city then it is best you know that on one special Saturday every September there will be hundreds of people walking up and down your street looking for garage sale bargains.
*
For us East End Day usually meant, "Day to  leave town and go camping."
*
One dark year it turned into, "Time to buy lots of stuff my neighbors are trying to get rid of and bring it home to mix in with all the stuff I should be getting rid of."
*
To Claxton this year's East End Day was a time to turn inwardly, asks the big questions then turn to me and say, "Let's admit we will never use that 50 lbs of candle wax we're sitting on in the basement." An aside: We used to make sand candles with the kids on our weekend camp outs. (Good times eh, Teal? Now, don't you roll your eyes at me.)
*
And ever sinse I burned the neighbor-lady's retinas I don't need 500 canning jars for my super-spicey hot salsa recipes. She was trying to hang her laundry and her clothes line was down wind of our kitchen window where I was busily canning my own eyes out.  My triple batch of salsa steaming on the stove top caused everyone some optical difficulty for which I am eternally apologetic. (I solemnly vowed to Claxton that I was done with canning. And he was fine with that because he only likes fresh or frozen garden veggies anyway... But, I digress.) Time to sell the canning paraphanelia.
*
So, Claxton's on a roll with this garage sale opportunity. At one point he even makes some big talk of getting up at first light to prepare a fresh batch of funnel cakes for the throngs of early a.m. garage salers. (Another aside: Claxton's reserve idea for the day was to open a little ice cream booth on the very outer edge of East End and call it, "Custard's Last Stand." I'm much happier that he chose to hunker down  with the garage sale idea because he successfully opened up a lot of new space for me to stash more wool, and wool-related necessities. 
*
O.K. Back to the free pattern. Long story short (stop it),  I was of little-to-no-help with the garage sale unless, "Don't sell that ice cream maker because I plan to use it this Winter." counts as helpful, and I think it does because I just might really make some ice cream some day and Claxton just might welcome a cup on a frosty night. Even though I was fairly useless it would still be fair to say I was the co-host or trusty side-kick at the garage sale.
(Segue coming.) AND IT WAS DURING THAT TIME OF HELPFULNESS, when I was on garage sale standby, THAT I CREATED THIS PATTERN JUST FOR YOU:


Below you will find that I also made you a printable graph:

And here I typed up your very own play-by-play instructions:


I hope the above jpeg  graph and instructions print easily for you and are legible.  If this format is simply too difficult to read then click here and grab the PDF or email me at: thetreadler at hotmail dot com
and let me know. I'll email you back and attach a PDF version. Why? Because I'm filled with the solumn joy that is East End where a pair of used in-line skates and a lovely old bread machine are practically gifted away to one's fellow man in the spirit of the season!

P.S. A great big THANK YOU to Laura M. for pointing out a few corrections to my Row-By-Row directions. Those changes have been made.