Jul 25, 2010

Feelin' Groovy


And, here she is! My painted silk warp, the very one I've been yearning to finally harness onto the loom and she (for certainly this warp is too pretty to be a boy)  is, at last, settled in and ready to be woven! I threaded in three long scarves worth of hand-painted silk! (Oh how that painting process took forever).

The previous project hung around for a bit too long. But, I'm actually quite pleased with the 12 shadow woven cotton towels that I had to buckle down and weave off  in order to free up my lovely cherry wood floor loom, old "Betsy", old "Cinnamon Sticks", (not sure of a name yet) in order to move on with my silk project.

Moving on... here's that hand painted silk warp (that was shown above) interfacing with the snow white silk weft (that is shown below) creating an "undulation". Wow, that certainly is pretty groovy.

Throwing the shuttle a few hundred times and I'm starting to feel inspired!

Do you see the wefty-wavy-gravy playing with my hand painted color changes?

How about now?

Can you see it now?

I think I was meant to paint and weave pure silk only. (This could be a problem as it is intensely expensive and I do have a great abundance of cotton at my disposal just at the moment.) What is the Treadler to do?


Keep on groovin' I guess.

Jul 10, 2010

Death Warp

I have hundreds of pairs of knitting needles. Consequently,  I have zillions of unfinished knitting projects. But, there is room for only one 8 harness floor loom in my house so, there can be only one unfinished weaving project at a time threaded throughout this contraption and residing therein...and gumming  up the whole works until it is woven off and...o.k., o.k.  THIS IS A GOOD THING.

I realize and understand that if every unfinished knitting project I had were to take up 8 square feet of space in my home I would have to sleep in another country. While I'm new to this weaving thing I can already say it will make you finish a project! You don't start a new one until the old one is off that loom.

And yet...

I just measured out 7 yards of lustrous 20/2 silk warp threads at 30 ends per inch to make three  9.5 inch scarves. Then I painted that warp (after securing "the cross" and tied off the odds and the ends and then I took it off the warping board and soaked it and wrung it out and laid it out...)
I painted my silk warp in pretty, pretty colors! I wanted to recreate the colors of the northern lights as I like to think of them...


Isn't it lustrous? And, isn't it sad how it just hangs around with nowhere to go? Alas, that's because a fine, old, cotton, shadow weave project is still on the loom with a good 4 whole tea-towels to weave off yet before my precious  honkin' ginormous cherry wooded loom monster beauty is free to take on the silky warp that is all dressed up with no place to go.

I see what is going on. I have to grow up now. The Treadler has to finish what she starts before she can start the new thing she wants to get underway. I HATE THIS!


Jun 13, 2010

I'm in Love with My Loom

When I was in the 6th grade I would sit in my room and listen to Queen's,  A Night at the Opera over and over and over again on my record player. I loved Bohemian Rhapsody. It was very popular at the time but, my most favorite song on the album was The Prophet's Song. (That one would get stuck in my head for days on end.) The first concert I ever  went to was Queen at Municipal Auditorium in Kansas City and, I remember, Billy Squire opened the show.

So - well, a few years have passed. Ouch, and yet not so bad actually. I prefer where I am to where I was in the 6th grade. It can be a bit like digging up an old time capsule though,  to pull out the music of one's childhood and really listen to it again. Strange how that special music can take me back just like the smell of lilac blossoms or a freshly mown lawn can send me somewhere far distant from where I am in the present moment. While I think it is best to stay right here in the wonderful now of living the life that is before me I have to admit it surely can be entertaining to go all the way back to revisit the distant memories of a 6th grade self. If a picture is worth a thousand words then a few songs can be worth... (I don't know what. I can't seem to put it into words.)

Let me get down to what I'm trying to convey here. There is a song on the album that I never fully understood. The sixth grade girl listening to A Night at the Opera did not get the same things out of the album as she who is writing you today.  The sixth grade listener never appreciated, "I'm in Love with My Car" The joy of that tune eluded me....until now.  I'm in love with my 8 Harness Loom. Oh yes, now I get it. I can fully appreciate the love for an inanimate object. And, poor Claxton has noticed this and recognizes it to be true.

He recently said, "I see now that you have this floor loom you don't need me any more."

As I expect the condition to be a temporary one I totally denied his claim. After all, 8 harnesses of cherry wooded magical wonderment cannot totally overpower one forever can it? Certainly I will recapture a perspective that prioritizes Claxton over this amazing Loomcraft 40", 8 shaft, floor loom with 12 treadles and the power to weave an intricate number of threads-per-inch into a vast assortment of majestic, cohesive fabrics of colorful blissfulness...yes? I'd like to think so. Here are a few pictures of my first projects. I'm making dish towels.


Shadow Weave. YAY!

I hate the thought that someone might read this and say, "Oh that poor, poor Claxton."
Please keep in mind that we are in the month of JUNE 2010 and the World Cup is at a fever pitch and will be going strong for many days to come. Truly I tell you Claxton has forgotten that we even have a honkin' giant loom in the livingroom. He is somewhere in Africa shouting, "GOAL!!"

Oh yes, and we have blossoms on the tomatoes! (The below is proof that I do go out-of-doors.)
 
Happy World Cup Everybody!!

May 23, 2010

Well...

There's a lot to write about but, I don't have time because I've gone even crazier.
 Poor Claxton. He's so very kind and good to me and for 4 days last week the only way he was able to get from our living room to the kitchen was to go out the front door, around the house, then into the kitchen through the back door (it's been raining, by the way).

Why has Claxton had such a time making his way through our home? Well, as I said at the start there's a lot to write about but, I don't have time...so, I'll say it in pictures:

Above is a whole lot of hand spun Icelandic wool. This effort was my little part in an Icelandic Study Group I joined when  I had the good fortune of meeting this artist/shepherd. The spinning of the wonderfully white fleece led to the painting of these skeins:

I painted the yarn so that I could use the new rigid heddle loom I purchased at the Duluth Fiber Handcrafter's Guild Sale (a place where, I'm sorry to report, many fiber addicts encourage each other to become only more afflicted. We're really no good for each other at all!):


I mean how was I to know that the act of warping this loom would lead to the further warping of my own sorry self?
So, I wove and I wove this little warped warp of mine which resulted in this:

...with cute little fringes:

...and which led me to the (natural) conclusion that I needed a larger loom...

So, Claxton and I went on an odyssey to the outer reaches of Eden Prairie, MN where we met the most wonderful woman who sold us her most treasured floor loom and now I'm warping at a whole new level of warpedness.  (More about this fantastic person later as she gifted me with a weaving library that should keep me crazy-busy for the next 5 years.)

Please note that this is a happy little picture of a loom that has finally found its own space. For a week it sat in the hallway making Claxton's travels from living room to kitchen a bit...cumbersome.  When one brings something the size of a couch into one's already  fiber-filled living quarters it can disrupt the flow of traffic a titch. (But, almost anyone will tell you that it's worth it!) This picture was only taken AFTER the beautiful, beautiful, 8 harnesses of cherry woodedness were prominently arranged where our couch once resided.

And, here she is with 10 full yards of towel warp ready to be woven.

I'm on my seventh towel and, like I said at the start, am way too busy to be web logging thank you!

But...let me also say that the tomato plants are thriving:

...which means I'm still  a "go" with that crazy plan of actually spending time outdoors this summer.

Our mean frost date up here is mid-June so, I just keep transplanting the green cuties into larger and larger containers under the lighting system. Claxton says it might be time to plant so he's off fetching the potting soil  right this moment and I'm getting ready to take them all outside.

Between weaving towels and planting tomatoes I have no more time! I surely do hope your days are filled with this sort of intense excitement as well.

Happy Mid-Spring!

Mar 21, 2010

Spring Equinox in Northern Wisconsin

Before we moved from Kansas City to northern Wisconsin I was seriously into gardening. That interest has faded a bit over the years.  It may be, in part, because I had a hard time adjusting to 6+ months of winter. In all fairness it is a bit of a climate change. (Last year we didn't even have a summer season, just extra helpings of winter and spring.) It might be that, after all those years of weeding and watering I just got tired of playing in the soil. Truth is I lost a lot of my enthusiasm for gardening about the same time I became wool-obsessed.

This weekend marks the beginning of spring and, even though that means very little up north I found myself down in the basement digging out the old gardening flats, pots and soil mixes. I know! What is going on? And, I was right in the middle of charting and knitting a fantastic fair Isle tissue box cozy too. The sun shone through the window and onto my graph design and before I could say, "Wait until I finish this row" I was elbow-deep in potting soil.

I seeded two flats of tomatoes, basil, lobelia, and African daisies. It's not going to be much of a garden compared to the crazy days of yesteryear but it is a small step away from the spinning wheel. (It appears I actually plan to spend some time outside this season. Yay!) 

So, once the flats were seeded I bagged 'em. I want a successful germination so I have to keep these little cherubs nice and warm. The only consistently warm place in our house:


I placed the bagged seeds on top of the furnace next to the boiler in our basement. I'm guessing in a week to 10 days there will be some sort of sprouting action to report. Then I'll move the tiny plants under lights! When the growing season is as short as ours is up here you have to take advantage of an early, indoor start. (Please note: no matter how many lights you have or how early a start you make, never try to grow cotton in northern Wisconsin. It's a fool's game.)

But that isn't all! Look at these bread boxes I found at a thrift store (below):

Are these not perfect little green houses for propegating?
The bread boxes keep conditions warm and humid for these little impatiens cuttings. They should sprout well here and be full-fledged plants by June when it's finally safe to actually plant living things in Wisconsin, outdoor window boxes.
When I lift the lid it is decidedly warmer and far more humid inside the bread boxes.

Well, that's it on the gardening front. Time to get back to the serious business of treadling wool. I need to spin up a bit more yarn pronto. (After all, this latest tissue box cozy isn't going to knit itself you know.)

Mar 19, 2010

Free Knitting Pattern Tissue Box Cover Cozy

As is customary of "The Treadler" I do have my yammerings to share  but FIRSTLY,  Let's have a go at this pattern shall we?

MATERIALS NEEDED: 

One upright, (squarish) naked tissue box in need of cozying.

U.S. size 5 / (or 40 cm)  16" Circular knitting needles OR a set of 5 double pointed knitting needles OR well, you know, there are a great many ways to knit in-the-round so choose your favorite and follow me.

Crochet hook size  1/2 .75mm to embellish the top (optional).

Yarn:  By the new weight standard you want to use #3, Light Weight (the old alias for this yarn size is DK Light-Worsted.) At this point I've made 3 cozies and none of them weigh more than 2.5 ounces. You can safely complete a cozy with less than 3 oz. of yarn.

4 place markers (I just use scrap yarn in a slip knot) One should be of a different color than the others to mark the beginning of each round.

NOTE: The above boils down to, "use the needle size and yarn that gives you approx. 21 stitches per 4 inches across. You will control the height as you knit. AND, remember you are dressing a tissue box. It is not going to refuse to wear your cozy or complain that the cozy is too baggy or too tight, makes it look fat, etc...

I spin my own yarn so...no particular brand endorsement from me except to say, "Come on and start spinning! You'll love it!" Also, you can use wool so that if the cozy is too big for its box there's the option to felt it down a bit.

CAST ON: You'll be knitting around to make a square. Cast on 88 stitches. There are 4 sides to the tissue box so that's 22 stitches per side. (We'll use the stitch markers to tell us where the corners are.) 

Round 1: Place a marker at the beginning (It should be a different color than the other 3) and  join your stitches. Be sure that your cast on stitches aren't twisted or you'll be in MOBIUS land. (K 22, place a marker) 3 times then K22 = 88 total stitches.

Round 2: (This round is what you will be doing most of the time)
(K 4, P 2, K 4, P 2, K 4, P 2, K 4) Repeat 3 more times, or at the start of each marker, all the way around.

Repeat all of round 2  four more rounds.

Cabling Round: (Time to make the pretty twisties.)  
*K 4, P 2 (Slip next 2 stitches onto cable needle and hold them behind your work, K 2 stitches, now K the 2 stitches from the cable needle, P 2) Repeat everything in parenthesis once more, K 4. One side is complete

Repeat from * all the way around (3 more times). If cabling is new to you check out this link:

Note: You don't need a special cable needle, you can use a dbl pointed needle OR, be a brave little soldier and try this flying trapeze method:
This is fast and easy but, can be a little scary for folks afraid they might drop a stitch.

CONTINUING ON: For the entire body of the pattern you will knit Round 2 Five times then complete a cabling round. Keep doing this until your knitting will cover the height of the box. Depending on your particular knitting style the number of rows will vary. Your tissue box is about 5.5 inches tall (14cm) so be sure your knitting is just a little bit longer than that. Now you are ready to decrease at your 4 corners to knit over the top of the box and to the center opening.

DECREASING ROUNDS (In essence you are starting at a corner):
(K 1, K2tog, K to the last 3 stitches before your next corner marker, Slip one stitch as if to knit, slip the next stitch as if to purl, slide the left needle back into them and knit them together from the back, K last stitch) Repeat 3 more times all the way around your box.

Questions about decreasing? Here's a good link for ya: http://www.knittinghelp.com/videos/decreases

These decreasing rounds are pulling in the 4 corners of your box. You are decreasing two stitches at each corner or 8 stitches per round.

First round of decreases will take you from 88 total stitches to 80
the second round will bring you down to 72 and so forth.
I like to complete 7 full rounds of decreases for all my tissue box magic. IF you are using a circular needle for your work you will want to switch to double pointed needles as the project shrinks down.

By the end of the 7th round of decreases you will have a total of 32 stitches left. Bind off these last 32 stitches but do not break the yarn. 

CROCHET Embellishment for top (This is optional but, really jazzes up the top of your box with a ruffley opening for the little tissues):

ROUND 1: Place crochet hook in that last bound off stitch and ch3, Double stitch all the way around in each of the bound off knit stitches and join.

ROUND 2: Chain 3 and *Dbl crochet in first stitch, 2 dbl crochet in next stitch, repeat from * all the way around. You have increased your stitches dramatically (every other stitch) creating a bit of a ruffle in this opening. Join.

ROUND 3: Ch1, sc in first stitch, (*ch3, sc) Repeat from * all the way around.

Bind off and work in all the loose ends. Mission accomplished!


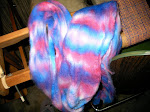
Above is a picture of my fluffy fibers before they were spun into yarn. You can see I blended the wool to slowly change color along the way. I think it is fun to make the tissue box become lighter and lighter as it gets to the top. That fluffy, white tissue peeking out really POPS. But, you can do anything you want...

Create yourself a box that is all one color, or heathery, or twinkled, or has a smaller opening, or has a different cable design in the middle of each side or...well, the possibilities are endless. I never dreamt I'd be all up-into making tissue box cozies but, here I am sending Claxton to the drug store on mega-tissue runs and planning cozies for everybody on my holiday gift list (act surprised). Sad? Yes! But, this entire web log is laden with similar obsessions so at least I have the comfort of consistency.


And there you have it! A lovely, free pattern just in time for allergy season!  Whoah! I may have just had an epiphany whilst typing this. What say you to a fair Isle tissue cozy? Would that not be the coolest thing ever? Bohus cozy? (Clearly, we will be needing more tissue boxes.) To the Spinning Wheel AWAY! 

Feb 14, 2010

A Valentine For Clax

This rhymey poem, dear Claxton,
Holds a special thanks from me.
I'm grateful that you tolerate,
 My fiber odd-yssey.

You could have me commited.
It's not that hard to do.
It's not like there's no evidence,
to push the verdict through.

For, if you chose to testify,
(and thus incriminate)
A quick commitment hearing,
would securely seal my fate.

It was you who found our crock pot stuffed,
with wool and walnut hulls.
(They dye a lovely brown that's
colorfast and never dulls.)

And, you know the salad spinner's
only used to spin dry wool.
And, that your brand new shaving brush
is now a fiber tool.

And, how our pasta roller,
Is now my cotton gin.
And that all these crazy antics,
Make you weary, weak and thin.

Yes! You could prove insanity,
Quite easily enough.
And then you would be shed of me...

But, stuck with all my stuff!

Happy Valentine's Day!
So, here is a miniature heart just for Clax. That's right, made entirely of wool that was freshly scoured and then one half dyed a cheery red just this last Friday. The fleece has been spread out on towels drying in our hallway. (Clax has had to take quite a detour to get up and down the staircase but, he'll surely think it all worthwhile when he receives this, his 100th woolen giftie!)

Feb 5, 2010

Secret Stash

Last night I was oh-so despondent and this morning I'm oh-so very happy. Last night I thought I was almost out of wool. When I say, "almost out" I don't really mean all the wool on my multiple shelving units, or the wool in the big box that is for sharing when teaching classes, I mean I thought I was almost out of undyed wool. When I say "undyed wool" I don't mean the two raw fleeces I have yet to scour, or the two scoured fleeces I plan to drum card soon, or the undyed Corriedale rovings for felting or the Icelandic roving for the study group, I mean undyed, commercially prepared, combed top. Last night I thought I only had a half pound left. So you can understand why I was despondent!

This morning, however, as I was packing for a spinning class I noticed a lovely carry-all that had been tucked away. I figured it might be handy for lugging teaching supplies and samples. Lo and behold it was a secret stash of combed top - a stash so top secret it was unbeknownst even to myself!

Wahoo! This happened once before when I surprised myself with a 1/2 pound of lustrous alpaca roving but, that was a long, long time ago. I dashed to the scale to quantify my delight:

TwO-PoInT-SeVeN-FiVe-PoUnDs! That's over 44 oz. That's eleven 4 oz braids I can dye. (I'm really having fun dying 4 oz braids.)

Best of all, Claxton was still asleep when this discovery was made. I had just spoken with Mr. Clax last night about needing to make a very large purchase in the very near future - and, make no mistake I still do. But, Claxton needn't know about this discovery... for good reason:

Seven years ago I accidently left my purse on the roof of the van and Claxton noticed it. For seven years, whenever we go anywhere or return from anywhere or think about going or returning from anywhere Claxton says, "Do you have your purse?" Three years ago I stopped carrying a purse so he started saying, "Do you have everything you need?"

Exhibit B: Five years ago I caught a great sale on taco seasoning packets (10 for a dollar). Ever the thrifty shopper I purchased a few dollars worth. When I got home there was CLAXTON unpacking and putting away our groceries when he comes across the packets.
     "Why would you buy all of these?" He askes.
     "Because they were on sale, they're handy and they really jazz up our bean dishes." I say.
Claxton lifts the lid on my Grandmother's old ceramic cookie jar where apparently I had been storing several taco seasoning packets. Again, this was five years ago, we have long since used up all of the taco seasoning packets from that dark day of my "crazy shopping" episode and still, to this day whenever I bring home any type of seasoning packet, be it gravy, chili, fajita or the infamous taco Claxton always says, "Are you sure we don't have 500 of these tucked away somewhere?"

I rest my case and whisper to you now, the secret stash of wool has been carefully tucked in with the regular stash and we shall never speak of it again. 


Feb 2, 2010

Scouring a Raw Fleece ~ I Love You Mini Spin Dryer!

Well, last post I was dying wool and might have mentioned how I had a bit of a strange urge to bite into the colorful fibers. I figured, "O.K. That's odd but, not surprising. After all I am stricken with the chronic fiber fever that plagues so many, many knitters, hand spinners, weavers, etc., (we know who we are)... Perhaps if I dye wool for all the rest of the day I'll be satisfied and this urge to nibble wool will pass.

Four big, fluffy, (delicious looking) braids later I began to worry. Time to nip these unnatural feelings in the bud. But how?

Cleaning a freshly shorn fleece in preparation for making one's own hand spun yarn is a bit of a right of passage for the hard-core spinster. I've scoured many a fleece and can tell you in no uncertain terms that the process, while most satisfying, is anything but scrumptious.

There's plenty of barn yard aroma and sticky lanolin in the above locks to draw a person back into the here and now believe you me. Time for a hot soak in a sudsy mix of water and Orvus Paste or Dawn Dish liquid.

Either will work very well in getting the grease out of the fleece. I will say I'm rather partial to the Orvus paste. (You can find it wherever fine livestock products are sold.)

There's no real secret to this process beyond settling the fibers into hot water that has a big dollop of Orvus or Dawn. You want your cleaning agent to disolve into the hot water before dropping in the fleece but, only stir to disolve don't get a bunch of suds going.  The real trick is in remembering to not agitate the fibers while they soak. This is another odd temptation for the fiber addict to overcome. There's a powerful urge to get in there and swish and swish the wool clean. Great way to make felt. Poor way to scour a fleece in preparation for spinning. Just let those fibers sink down into the bath then gently lift them out of the very brown water.

Believe me the water will be brown. (A raw fleece is like a big ol' poo, poo tea bag steeping...and, yay, my appetite is curbing.)

It is also important to remember to remove the wool before the water cools down enough to allow the lanolin to become gummy again and adhere once more back onto the fibers. Next, drop the wool into a rinse of hot, clean water. Again, no swishing and no running water directly over the fibers. Also, no sudden temperature changes for these are all great ways to turn a downy fleece into a matt of felted fabric. The rinse bath might need to be repeated a few times. You want to dip your fleece into fresh, hot rinse water baths until you notice that the water remains clear. 

 Now, to dry the fleece you don't want to squeeze or bunch up or twist or roll into towels and jump up and down on... or treat your poor fibers to any other cruel water removal madness. Centrifugal force is your friend here. I used to love using a simple salad spinner. But, heavy wet wool can wear those little contraptions out rather quickly. Some folks use the spin cycle on their washing machine. That is fine as well. You can also place the fiber into a netting bag or pillow case, take it outside and swing it around and around wildly over your head sending sprays of water out in every direction.  All of these methods utilize centrifugal force to get the moisture out of the wool.

Here is my new, most absolute favorite way to spin dry a fleece:
It's a countertop spin dryer from The Laundry Alternative and I love, love, love it! (The coffee can is pictured just to give you a size perspective because this mini spin dryer is deceivingly large.) I was happily surprised with how much fiber fit comfortably inside!

The spin dryer is primarily marketed to folks who wish to cut down on utility expenses when doing laundry because it pulls out far more water than the typical spin cycle would on a large washing machine thereby cutting drying time down tremendously. Also, I used it between wash and rinse baths and the spinner really drew the soapy suds out of the wool. The very first rinse bath was crystal clear! And, I have to say I loved how fluffy soft the wool came out of this little contraption.

Look how sparkling clean! Couldn't you just eat that up?
(And I've come full circle.)

Jan 31, 2010

Results of the Evil Dye Lab Experiment

Well, the fiber addiction has reached a new low.
I could eat this 4 oz. blend of wool and mohair.
Imagine the fur ball I would have to cough up if I did.

Still, part of me thinks it would be worth it.
Is that odd?

I'm not going to eat it. And, (heavy sigh here) I'm not going to spin it either. I've placed it in my little Etsy shop...for now. We'll see how long I can last before I yank it out of there and start spinning.

I think I might need a sponsor ~ someone I can call during moments of weakness. The sad thing about fiberholism is that there is no cure. It's not my fault I'm a fiberholic but, alas, it is my responsibility to control the symptoms.

Jan 29, 2010

Dying Wool in the Evil Laboratory ~ Microwave Dying

This posting will not be a tutorial. There is no method to the madness here. In my last post I demonstrated how to twist a nice length of prepared wool top into a compact and manageable braid without dividing the fibers into three strips. That happy braiding process is the starting point of this most evil experiment.
Aren't they lovely? Five  fantastic, 4 oz braids from a commercially combed wool/mohair blend. The mohair adds a touch of luster that is going to really make those acid dyes pop!

First we condition the fibers, make them comfortable. I've prepared a warm soak with just a touch of Synthrapol to encourage our unsuspecting fibers to be receptive to the dye treatment.


(Again, this is an evil experiment. Measurements are made in pinches, dashes and dollops.)

The braided fibers are left to relax and soak in the warm, sudsy water.

Evil ensues, I have plucked one of the braids from the bath. I do not want these fibers to be sopping wet so I  gently squeeze out  much of the soaking solution and arrange the braid on the (slab) operating table.

HOLY COW!  I bet you didn't see that coming. (Heh.) Reminds me of television, when I'm watching a happy, little show about apple orchards or bunnies and suddenly some crazy CSI commercial appears out-of-nowhere with the blood and the guts and the gruesomeness... No warning... No time to shut my eyes or flip the channel...

So, what is in the syringe? I started out with a nice splash of a 1% dye stock solution. I love Sabraset/Lanaset dyes. They are oh so very light and color fast (won't fade) and wonderfully vibrant. To each of my dye cups I add a bit of chemical water: sodium acetate and citric acid crystals. Amounts? (Heh, heh.) Here I must point you to the voice of sanity. This book is a must for the serious fiber artist who loves to dye wool: Color In Spinning by Deb Menz. You will thank me for not handing you the answers. By the way I have nothing to gain by referring you here. This book is a joy and a necessity. The woman dedicated 10 years of her life to perfecting the truly scientific process of dying wool. It is not for me to deny you this experience by tossing out  crazy, irrelevant measurements that are herein only loosely based in reality.

I just have to say, if all the world were addicted to the textile arts then bubble gum trading cards would include super heros of the fiber world and Deb Menz would definitely have her own card. (For my money a Deb Menz card, in mint condition, at a well advertised auction would glean several thousand dollars.)

I have much more to say on this topic of collectible, super hero, fiber artist, trading cards...And not to be dropping names but, I'd want to be sure my personal trading card collection included an Alden Amos, a Mabel Ross, an Elizabeth Zimmermann and a Peter Teal...but I digress. (That's O.K. because I'm in  scary, mad scientist mode.) And, this is what we have after several more injections:

And, here we see the patient has been flipped over in preparation for more treatments.
And, after further injections...

Who's the mad scientist now?

I think this experiment has all the earmarks of a successful operation. But, as the old saying goes, "No brain no pain." Strike that. I mean to say, "No pain no gain." Whichever, it's time to bring on the heat!

After all, acid dyes are heat-set dyes. I'm going to use a microwave. (Yay.) And, although I am a mad scientist I'm not crazy. The microwave I use in all of my evil dye experiments is never, never, I repeat NeVeR used for heating food that one might put in one's mouth and eat. (For that matter none of the tools  pictured will ever be used for food processing. Go to a thrift store and thusly recycle what you need for your own wonderfully evil dye lab.)

Above: Here we see the colorful braid "entombed" in a microwavable roasting tupper. This was an unusually special thrift store find at $2.50. (If there were tight-wad, thrifty-person trading cards I would be my own hero. And, my trading card would be worth several tens of dollars - for insurance purposes only .)

And here's my $5.00, thrift store, 200 lb wool-dying microwave from sometime before the turn of the century (when things were built to last, thank you very much). It has simmer mode. And now we wait?
  
And, now we wait.